Best Drywall Installation & Repair in Roanoke Va Reviews
How to Hang Drywall Similar a Pro
Go that sheetrock upwardly fast
Introduction
Installing drywall is not rocket science, simply it volition go faster and wait improve if you learn the fundamentals before you start (instead of after you're done).
Tools Required
Materials Required
- 1-one/4-in. drywall screws
- 1-5/viii-in. drywall screws
- 2 x 2 (for optional crutch)
- Drywall
- Drywall nails
Drywall is one of the easiest-to-use and cheapest construction materials in the globe. Fifty-fifty a serious error will make y'all chuckle, knowing you've wasted little time and probably less than five bucks. And the coin you save handling the job yourself will come up in handy when furnishing that new room.
Hanging "stone" (curt for "sheetrock") doesn't require a lot of finesse, but information technology is heavy piece of work. But if y'all are in reasonably good physical status, don't be afraid to tackle i, 2 or even iii rooms on your own. It's sometimes hard to involvement a pro in hanging just a room or two, or even get on the schedule. Also, defining and roofing the walls with a finished material can be satisfying.
This how to install drywall article will demonstrate the basics of hanging drywall. If you do a proficient job of hanging drywall, the drywall can be taped and finished smoothly and easily. "Taping" refers to the procedure of filling fastener holes, applying joint record and three layers of taping chemical compound to seams and corners, and and then sanding. (Read more than most drywall taping here.) Poor drywall hanging techniques brand information technology difficult for even a seasoned taper to deliver a flat, uncracked surface that'south free of nail pops and ready for pigment. We'll show you the techniques and tools the pros use to go the drywall job done fast and in a manner that makes taping as painless as possible.
Video: How to Tape and Mud Drywall
Projection step-by-step (15)
Step 1
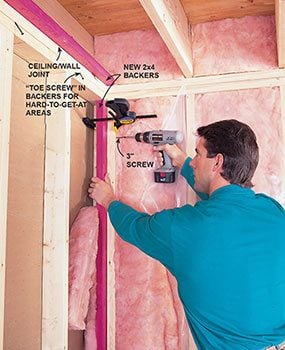
Fasten Backers at Corners
- Fasten wood backing wherever drywall ends have no back up within four inches.
- Note: Make sure to cheque corners and ceiling/wall joints.
Step 2
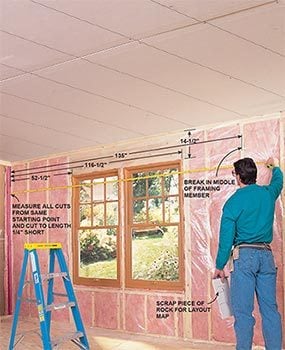
Measure out Carefully
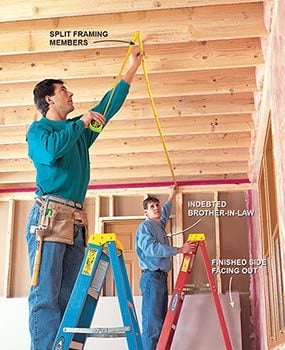
- Measure from the cease of the ceiling to the middle of a joist and cut the sheet to length.
- Pro tip: Terminate cuts should split framing members. Gaps at ends and splices should be less than ane/four inch.
- Mark fastening guidelines every 16 inches from the end of the sheet with a drywall square.
- Cut overall lengths one/iv inch shorter for easier fitting.
Selecting Drywall
Most drywalling calls for three basic types and thicknesses of fabric:
- One-half-inch for framing spans of xvi inches or less.
- Five-eighths-inch for spans up to 24 inches on ceilings. The 5/8-inch drywall is also called Type Ten or fire-resistant. It is used in areas where a firewall is required, such equally between a house and an fastened garage. Consult your local building official for installation specifics.
- Half-inch drywall that'due south water-resistant for humid areas such as baths (humid, not wet). This cloth is not acceptable for ceilings or areas such every bit tiled shower enclosures. Mold-resistant drywall is as well sold for areas similar basements where mold might exist a concern.
Door and window jambs and electrical outlets are usually set up upward for i/two-inch drywall, so check to confirm. Three-eighths-inch and i/4-inch are bachelor as well but are rarely used except on curved wall surfaces or areas where thinner stone is required. For example, if you lot're patching old plaster walls, 3/8-inch may be the only thickness that volition match the depth of the plaster.
Drywall usually comes in either 4x8 or 4x12 sizes. If you live in an surface area big enough to support a commercial supplier, it'll offer more variety than an average lumberyard. It may have 9-, 10- and xiv-foot lengths, 54-inch widths for 9-foot. ceilings and odd things like flexible drywall for curved surfaces. Drywall lengths don't radically touch on overall textile cost. If yous think you tin handle 12-foot. sheets (and if they'll fit through the stairwells), they're the way to go. You'll have far less waste product and fewer seams to tape. Proceed in heed that a 4x8 sheet weighs 55 lbs. and a 12-footer nearly 82 lbs.
![]()
Step 3
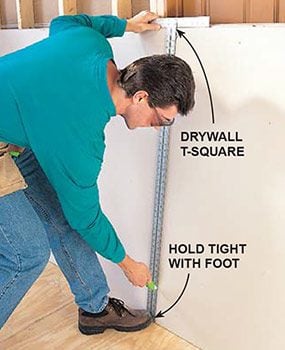
Score the Drywall
- Measure out the length needed and score the paper face with a utility knife, using a drywall square every bit a straightedge.
Step 4
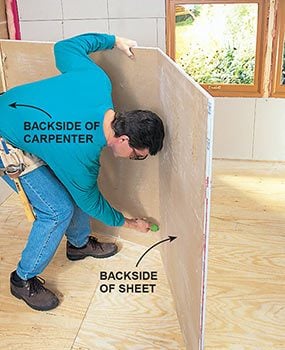
Snap the Drywall
- Snap the canvass, fold it open and cut through the newspaper on the backside.
Pace v
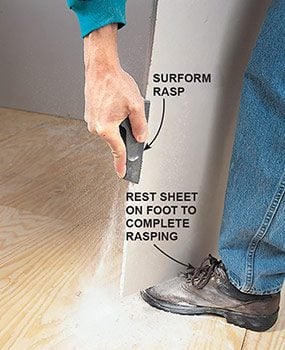
Shine the Edges
- Smooth rough edges on cut ends with a Surform tool to ensure tight joints.
Using a Drywall Lift
Drywall is heavy stuff, then consider saving your dorsum by renting a drywall lift for a mean solar day. A lift is fantastic if y'all're shorthanded or installing 12-human foot sheets. It disassembles hands, weighs about 75 lbs. and will fit in a minivan or small pickup. A lift makes information technology possible to hang rock solo, simply information technology'southward still nice to have a helper for loading the rock onto the lift. A lift tilts from vertical to horizontal. Wheels allow y'all to roll it up to the drywall stack, load a sheet onto the rack, curl it back into position and crank the canvass upwards into place. Although a lift tin also be used for wall placement, its strong suit is ceilings.
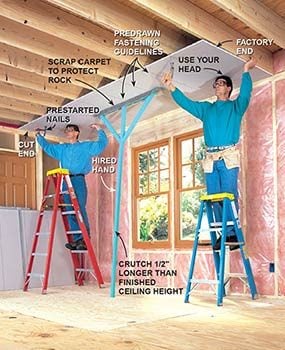
Pace 6
Tack the Sail in Place
- Hoist the ceiling sheets overhead and tack them into place using a "crutch" made of 2x2s to support the panthera leo's share of the weight.
- Prenail and position the sheet, tacking information technology to the joists.
Step 7
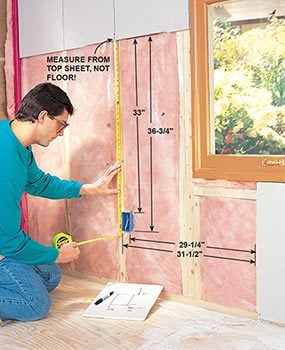
Measure the Upper Sheet
- Measure the distance from a wall corner to the middle of a framing member, also recording distances for cutouts and door and window openings.
- Pro tip: Avoid placing joints over doors and window corners, where they may fissure.
Pace 8
Cut the Openings
- Cut window and door notches from a single sheet past sawing sides with a drywall saw.
- Pro tip: A keyhole saw is slower, simply information technology is an acceptable substitute for long cuts.

Step 9
Stop the Cutting
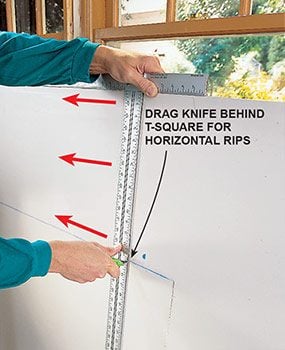
- Score the tertiary side of the notch with a utility pocketknife.
- Snap the section loose and complete the cut from the backside.
- Pro tip: For quick rip cuts, elevate your utility pocketknife backside the T-foursquare as yous slide it along the acme (nestle the blade of the knife confronting the ruler part of the square).
Step 10
Hang the Elevation Sheet of Drywall
- Elevator the top wall sheet, holding it tight against the ceiling, and tack it into place with nails.
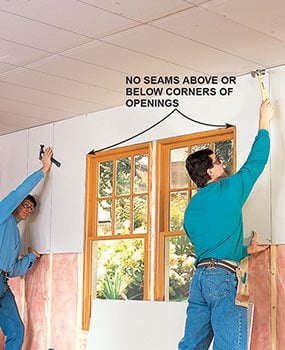
- Pro tip: This sheet should exist pushed tight against the ceiling before fastening. Never intermission joints at the edge of a window or door. These seams will eventually crack, and the buildup of taping materials volition brand installing casing hard.
- Pro tip: Don't forget to mark fastener guidelines before lifting.
Step 11
Measure Cutouts
- Measure electric box cutouts from all four sides.
- Check all layout measurements twice before cutting!
Step 12
Mark and Cutting the Drywall
- Transfer measurements to the drywall.
- Cut the outlet box openings with a keyhole saw.
- Pro tip: Take special care in planning and sawing cutouts for electric boxes considering if you lot miss, that oversized outlet hole is a bear to fix. Fixing a poorly cutting or overcut hole is catchy, and the repair volition never await quite right.

Spiral Cutout Saw
Although we don't show one in use hither, pros now use spiral saws to cutting openings for outlets, lights and even doors and windows. The basic idea is easy: Just mark the judge center of the outlet or light, hang the canvas of drywall, and so poke the thin spiral chip through the center marker and follow the border of the fixture all the way around. For door and window openings, hang the sheet across the opening and and then follow the framing with the spiral chip—no measuring required, and you lot get a perfect cutting every fourth dimension. Of course, it takes a little practice to get the hang of the tool, it kicks up a lot of grit, and the bones tool costs $70 to $100, but if you're doing more i room it may be worth the investment. For more information, see How to Use a Spiral Saw on Drywall
Step 13
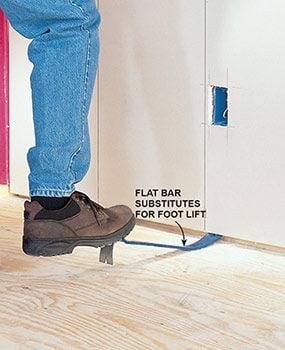
Lever Bottom Drywall Sheet into Place
- Hoist the bottom sail with a foot lift or flat bar and tack information technology into place.
- If an opening needs pocket-sized adjustments, shave the edges with your utility knife.
Step 14
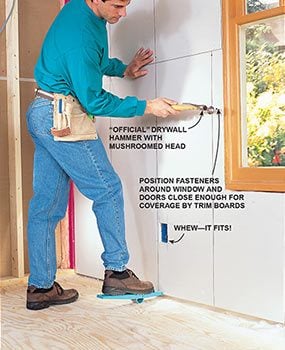
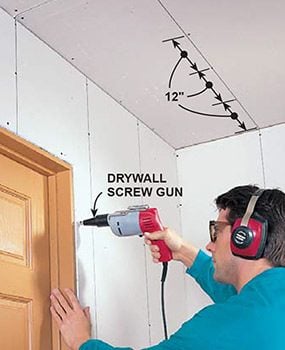
Stop Fastening with Screws
- Screw ceiling and walls with a screw gun.
- Pro tip: Utilise five fasteners per framing member, one in each tapered border and three more spaced evenly every 12 inches. Slightly angle screws on the ends of sheets, where in that location is just 3/4 inch of wood left to catch screws. If y'all run them in too close to the finish, the drywall core will break and they won't hold well.
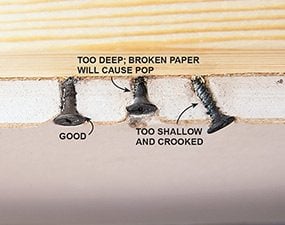
- Prepare screws and nails slightly below the surface of the paper, existence careful not to break through into the gypsum cadre.
- To hide the fasteners, position them close to openings effectually windows and doors so the trim will embrace them.
- Pro tip: Employ 1-i/4 inch fasteners for 1/2-inch rock and 1-five/viii inch fasteners for 5/viii-inch rock. Longer screws and nails are more prone to nail pops. Use equally few nails as possible and merely to tack upwards the sheets until you tin get the screws in.
Stride fifteen
Check for Protruding Screws
- After installing all the drywall, drag a putty pocketknife over every single fastener.
- Annotation: If y'all hear a click, you've plant a rogue fastener that needs to be gear up. Practice not use your hammer to prepare a protruding screwhead — this may suspension the screw, creating a bigger hole to patch, and will cause a nail pop in the future.
- When you find a protruding screwhead, screw it in a picayune more with a screwdriver or a cordless drill.
- Remove whatsoever fasteners that missed the framing fellow member.

More Drywall Hanging Tips From the Pros
- Don't try to save a couple of bucks by using scraps of drywall when you should exist using a full sheet. The fourth dimension and endeavour spent taping extra joints is rarely worth the coin saved.
- Ever join tapered edges to tapered edges.
- Stagger seams with each row of stone.
- Remember alee to make taping equally like shooting fish in a barrel as possible. Remove cleaved corners and loose chunks of rock, and cutting out any blisters. These will all be filled in later with a fast-setting articulation compound.
- Never use tapered edges for outside corners where corner bead goes. The thinner border of the drywall makes information technology hard to properly fill up the beaded edge with taping chemical compound.
- Every bit your last task, run a putty knife over all screwheads and set all fasteners below the surface. Since y'all put them in, information technology'due south your task (not the taper'due south) to make sure they're properly set up. Tapers go very upset when they accept to spend half of their get-go twenty-four hours on the job repairing improperly set fasteners. And the taper might be you.
Originally Published: November 03, 2020
mcmillionhingthat.blogspot.com
Source: https://www.familyhandyman.com/project/how-to-hang-drywall-like-a-pro/
0 Response to "Best Drywall Installation & Repair in Roanoke Va Reviews"
Post a Comment